8 Amazing NextJS Libraries That Make Coding Easier

It’s a secret to few React developers that Next is an amazing product. It has been the default framework for building a web app at my current company for the last two years, and its adoption is rapidly increasing.
Being able to control the way pages are built, where and when to fetch data is such a great experience.
By default, Next is remarkable, but it’s just the start. React has a broad library ecosystem that Next project can also enjoy. In this article, we’ll go through the default libraries, I use in all my projects.
Are Libraries Really Necessary?
Before diving into the list, I want to address this question: “Are libraries really necessary? » Short answer? Yes, yes you need the help of libraries if you want to build, in a decent amount of time, a web application.
You could be fine using solely Next if you’re building a simple portfolio composed of static pages and no user interaction. In that case, why bother with Next? Use plain HTML and CSS.
Since this is not the use case most of you will be into, I can confidently say that yes, you need libraries to both make your life easier and get the work done faster.
Things to Consider Before Adding a Library
As said before, installing libraries is normal and recommended. However, installing dozens of them isn’t.
Every added library will require maintenance, updates are frequent and needs testing to ensure a working application. Besides, adding too many libraries could cause security issues or bloat your bundle.
I’ll go through my decision process when it comes to choosing a library in a future article. Don’t hesitate to subscribe to the newsletter to get new articles right in your inbox.
This is why I recommend to always take sometime before running npm i and make a quick Google search to see if better alternatives exist (this applies for libraries presented here).
Lastly, you have to keep in mind that a poor library choice could result if hundreds of wasted developer times. So, better safe than sorry!
Libraries I Install on Every Project
The following list is the libraries I install right when beginning a project.
TypeScript
Let’s start this list by something that isn’t a library, but a programming language!
Using TypeScript has become the default at my companies at the same time, we decided to move from React to Next. We haven’t looked back since.
TypeScript can be summarized as a typed version of JavaScript. It allows developers to describe their data and help them write safer code. It’s amazing and can be incrementally integrated in projects.
The following quick example shows how TypeScript codes look like. We have a simple Person that has some required fields and optional lastName and age.
interface Person {
    firstName: string,
    lastName?: string, //optional data
    email: string,
    username: string
    age?: number //optional data
}

const getUserNameInfo = (person: Person) => {
    // Causes an error, lastName could be undefined
    const lastNameLength = person.lastName.length

    // Causes an error, age could be undefined
    return `${person.username} is ${person.age > 18 ? 'adult' : 'not adult'}`
}
The code won’t compile since we have some errors that are commented in the code. This kind of protection is what makes your code safer and more enjoyable to work with!
Doc

Installation
npm install typescript --save-dev
yarn add typescript --dev
pnpm add -D typescript
npm-check-updates
Second library on the list, second exception. I install this package globally since I used it for all my project, and it doesn’t need to be in the projects themselves.
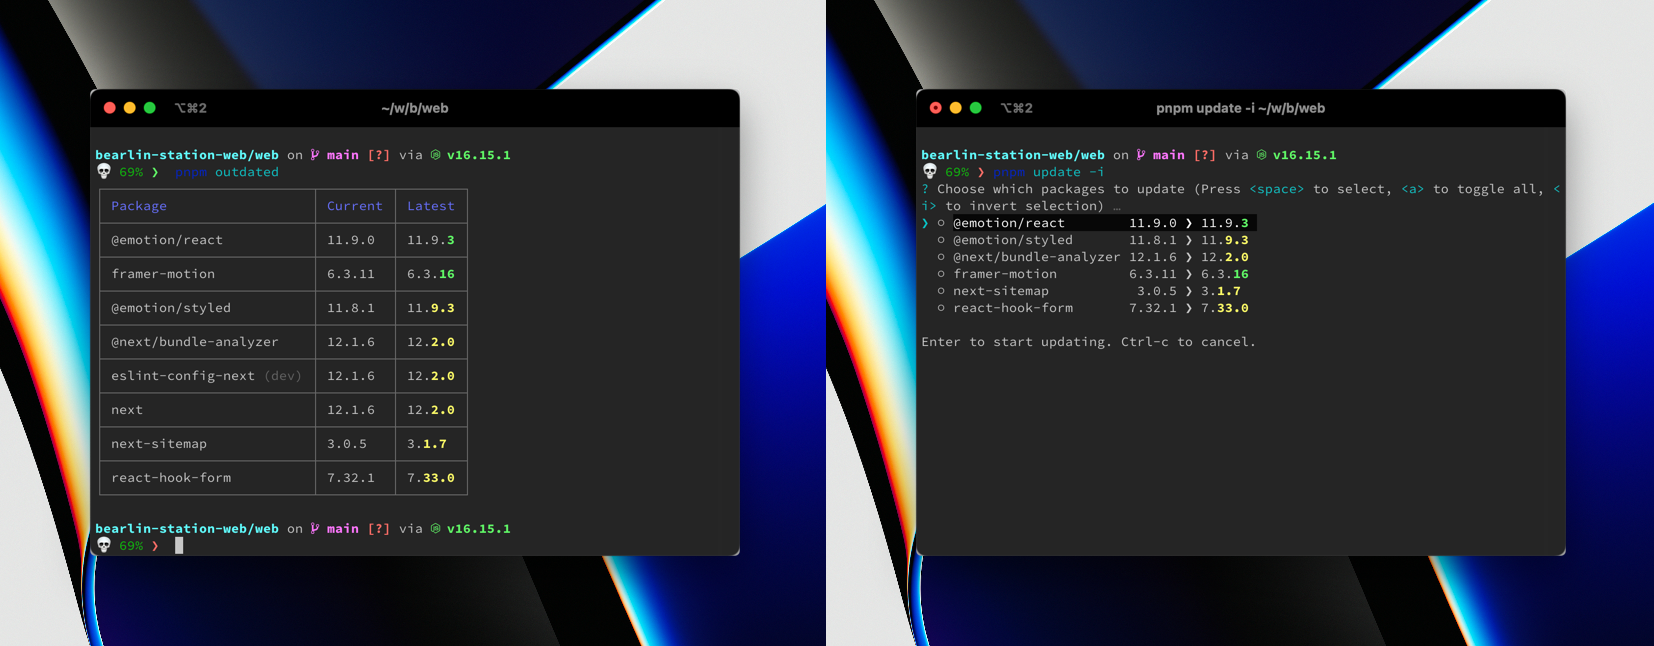
This library helps find outdated packages and allow automatic or interactive updates. You can simply run ncu to get a list of outdated packages. Once you know what’s available for upgrade, you could either:
- Update everything automatically:
ncu -u. - Update interactively only what you want:
ncu -i
I would personally recommend the interactive methods since you have to confirm if you want to update or not. The following images show how updates can be managed with ncu or with pnpm.
Doc
 raineorshine
Installation
npm install -g npm-check-updates
yarn global add npm-check-updates
//pnpm has a built-in udpate feature
pnpm outdated
pnpm uppgrade -i
Chakra-UI
I already discussed the benefits and things to consider before choosing a component library (in this article). For quite some time, we used Ant Design at my company, but we switched to Chakra UI last year and are so happy with it!
It’s true that the list of offered components are limited if we compare with competitors. That being said, the quality of the components, ease of customization and responsiveness of support is what set this apart from the competition.
Instead of relying on the Bootstrap column system for building UI. Chakra UI relies on developer CSS knowledge to build a responsive UI. There is a learning curve if you don’t have much experience with CSS, but it’s not as steep as you might think.
Besides, I assume that most developers have some CSS knowledge. If you want to perfect your Flexbox master, you can play Flexbox Froggy.
Why not tailwind, you might ask. That’s true that the framework is tempting but we decided to use Chakra UI regardless. The team is more experienced with component libraries, and having some elements prebuilt helps speed the development.
Doc


Installation
react-hook-form
Dealing why form is not the most enjoyable things to do. That’s why libraries exist to help in that regard. Two big names exist in the React ecosystem: react-hook-form and formik.
After testing both, we decided to go with react-hook-form since it offered everything formik did in an easier to read manner. Besides, the team has a YouTube channel where all features are presented.
You can see in the following example how a very simple form can be implemented in plain HTML.
type FormData = {
  firstName: string
  lastName: string
  age: number
}

const RegistrationForm: React.FC = () => {
  const {
    register,
    handleSubmit,
    formState: { errors }
  } = useForm<FormData>()

  const onSubmit: SubmitHandler<FormData> = data => console.log(data)

  return (
    <form onSubmit={handleSubmit(onSubmit)}>
      <input {...register('firstName')} />
      <input {...register('lastName', { required: true })} />
      {errors.lastName && <p>Last name is required.</p>}
      <input {...register('age', { pattern: /\d+/ })} />
      {errors.age && <p>Please enter number for age.</p>}
      <input type='submit' />
    </form>
  )
}
The library is powerful and is UI (component) library agnostic. This means that it works perfectly with Chakra UI. React-hook-form is so good that I now enjoy working with forms!
Doc

Installation
npm i react-hook-form
yarn add react-hook-form
pnpm add react-hook-form
zod
I only discovered this library recently, but it’s a game changer. For the longest time, I built classes with constructors. This meant that I had to manually parse and validate data coming from APIs.
This is now long gone thanks to zod. At its core, zod is a schema validation library. It takes whatever object you throw at it, make sure everything matches the defined schema, and returns an object.
This is great for form validation (but I prefer to use react-hook-form instead) but can also be used to “validate” data coming from an API. The following example shows how data can be schematized and parsed using zod.
export const userParse = z.object({
  id: z.string(),
  firstName: z.string().nullable(), // means string | null
  lastName: z.string().nullable(), // means string | null
  age: z.string().optional(), // means string | undefined
  email: z.string().email(), // makes sure this is an email
  role: z.enum(['user', 'admin']),
  favorites: z.string().array()
})

//Can be used throughout the app as type
export type User = z.infer<typeof userParse>

const getAllUsers = async (): Promise<User[] | null> => {
  try {
  const data = await usersCollection.get()
  return data.docs.map(doc => FAQZod.parse({...doc.data(), id: doc.id}))
  } catch (e) {
    // handle errors
  }
  return null
}
As you can see, using zod is quite simple and reduce the time to create data models down to the time it takes to describe it. Zod have built-in validation for every type it handles. This helps make sure that the data is present and in the appropriate format, while giving comprehensive error messages.
Doc
Installation
npm i zod
yarn add zod
pnpm add zod
next-translate
Translating a website can be a pain. This is why I use for all my projects (even the one that might not be translated) an i18n library. The one I chose is called next-translate and perfectly integrates with Next SSR, SSG and ISR.
While other options exist, I decided to go with next-translate since it’s easy to set up and requires little boilerplate. It’s quite similar to next-i18n while keeping things simpler.
Using a library compatible with Next is important since pages can be rendered on the server, generated at build time or on the client. Next-translate makes sure that the text is translated regardless of the strategy.
export default function ExamplePage() {
  const { t, lang } = useTranslation('common')
  const example = t('variable-example', { count: 42 })

  return <div>{example}</div> // <div>Using a variable 42</div>
}
Doc
vinissimusInstallation
npm i next-translate
yarn add next-translate
pnpm add next-translate
@next/bundle-analyzer
My colleagues often make fun of me because, after two hours of research, I managed to reduce the bundle size of a project by 10 KB. I admit that I get a kick out of hunting for this kind of optimization, it is still important to have a small bundle.
A small bundle means better experience for users (most of the time) and helps reduce the amount of energy required at each request. On top of that, Google uses web vitals in its ranking algorithms, so having a good score is great. It’s a win for everyone!
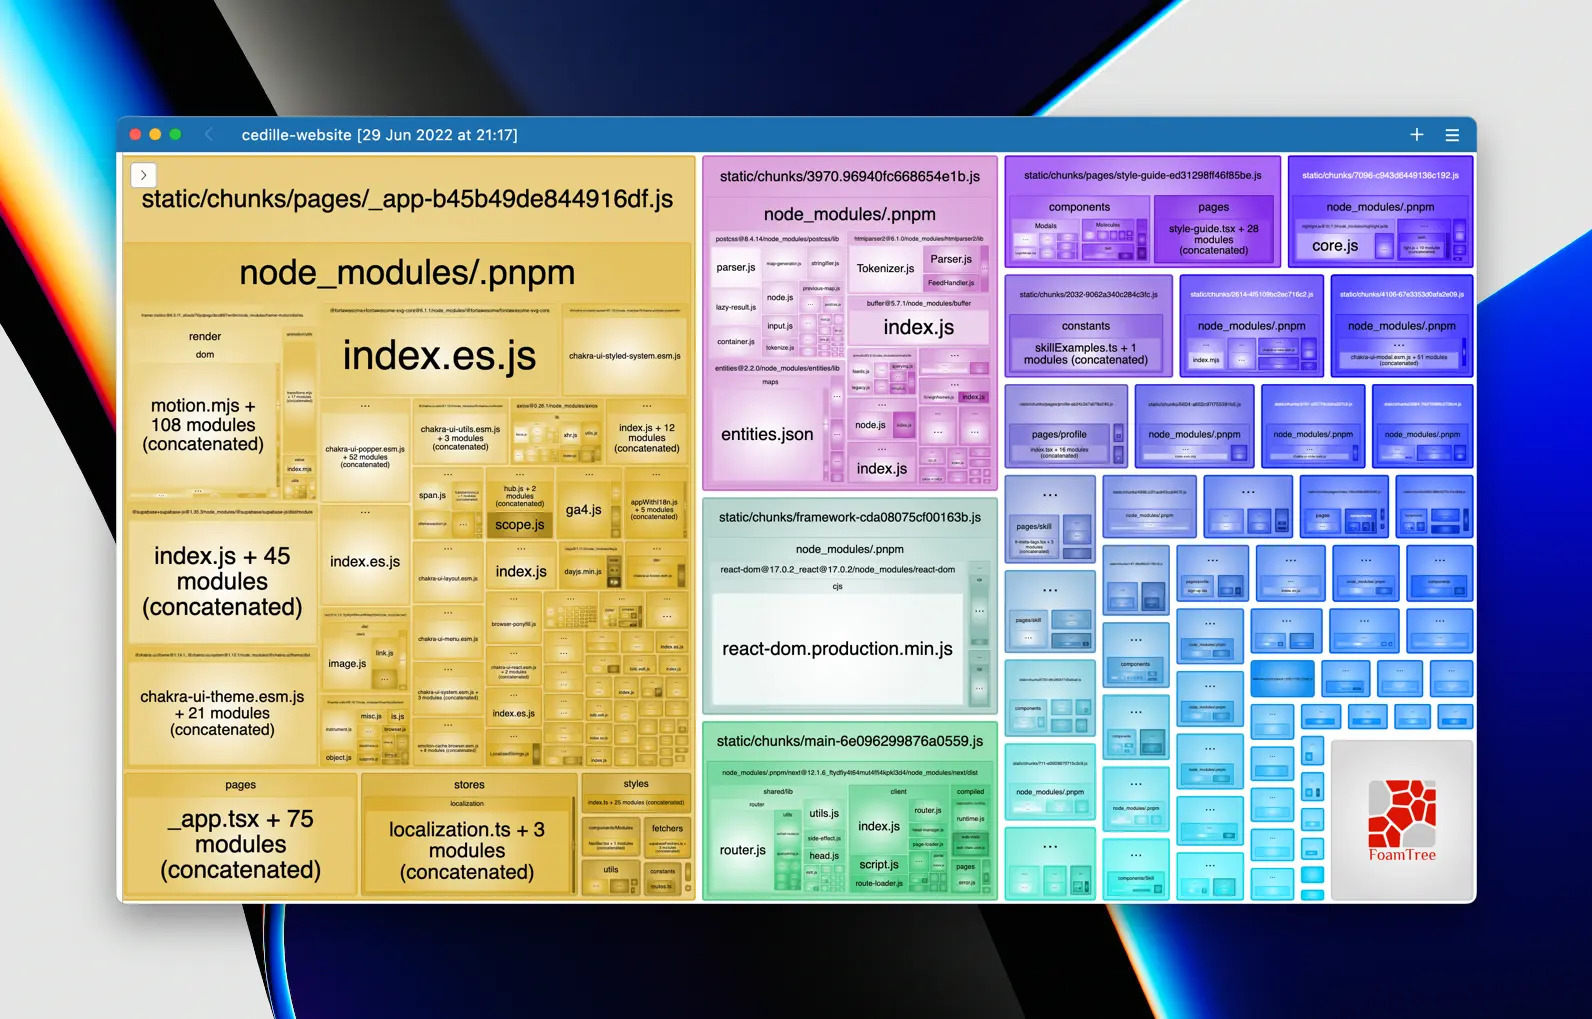
@next/bundle-analyzer helps visualize how a library could weigh the bundle. It’s also a way to determine whether a library is good or could be replaced.
That’s how I found that react-code-blocs was a poorly optimized library and that using react-syntax-highlight was better, even tho it required more work to implement. I was able to reduce the bundle size by 28% for an application what wasn’t optimized simply by analyzing the output of @next/bundle-analyzer
It’s worth mentioning that source-map-explorer can be used in parallel of @next/bundle-analyzer.
You can read how I reduce my bundle size by 30% in this article:
 Flavien Bonvin
Doc


Installation
npm i @next/bundle-analyzer
yarn add @next/bundle-analyzer
pnpm add @next/bundle-analyzer
next-compose-plugins
Next is configured with the next.config.js file. While it’s possible to keep plugins low, things can get more complex as project scale.
That’s why I use next-compose-plugins right from the beginning of any project. The library allows merging next config and plugins while keeping the configuration file readable.
Here is what a config file looks like for a project where I have next-translate, bundleAnalyzer and plausible installed.
const plausiblePlugin = withPlausibleProxy
const bundleAnalyzer = withBundleAnalyzer()

const nextConfig = {
  productionBrowserSourceMaps: process.env.APP_ENV === 'ANALYZE',
  i18n: {
    locales: ['en', 'fr', 'de'],
    defaultLocale: 'en',
    localeDetection: false
  },
  reactStrictMode: true,
  images: {
    formats: ['image/avif', 'image/webp'],
    domains: [...]
  }
}

const plugins = [nextTranslate, plausiblePlugin]
process.env.APP_ENV === 'ANALYZE' && plugins.push(bundleAnalyzer)
module.exports = withPlugins(plugins, nextConfig)
Doc
cyrilwannerInstallation
npm i next-compose-plugins
yarn add next-compose-plugins
pnpm add next-compose-plugins
Subscribe to the newsletter to get new articles right in your inbox!
Subscribe to the newsletterLibraries I Install if Needed
That’s all for the libraries I use by default on all the project I work on. There are however other options that I go to depending on the project requirements.
swr
There are no libraries that make data fetching easier than SWR. The solution works regardless of the backend used and supports SSR, ISR and SSG.
One line of code is all it takes to handle loading, error and resolving states. You can then focus on handling those different states and don’t have to worry about managing the request.
A request made with SWR will first serve a stale (or cached) version of the data while making the request in the background. Once the request resolved, the UI is updated without the user noticing anything.
That’s the core concept, but the library also supports revalidation on focus or network recovery, local mutation for lightning fast UI updates, pagination with state updates, …
The following snippet shows how a simple request on an API can be done using SWR.
const fetcher = (...args) => fetch(...args).then(res => res.json())

const Profile =  () => {
  const { data, error } = useSWR('/api/user/123', fetcher)

  if (error) return <div>failed to load</div>
  if (!data) return <div>loading...</div>

  // render data
  return <div>hello {data.name}!</div>
}
Doc
Installation
npm i swr
yarn add swr
pnpm add swr
zustand
As the project scales, so do application state. React offers an amazing library called Context and can work in most of the cases.
However, there are times when the application size gets too big or when wrapping your app in another provider makes no sense. This is where state management libraries come into play.
There are some big players such as Redux. However, they are quite confusing and requires a lot of boilerplate code. As you might have guessed, I don’t like to write code to make my library’s work.
I immediately fall in love with Zustand, as declaring a global state is as simple as creating a JavaScript object. Once this is done, the store is available throughout the application.
You can even save the store data in the local storage of the computer for easy recovery on next visit.
Here is the example they have on their git page, simple and efficient to build a global state!
import create from 'zustand'

const useStore = create((set) => ({
  bears: 0,
  increasePopulation: () => set((state) => ({ bears: state.bears + 1 })),
  removeAllBears: () => set({ bears: 0 }),
}))

const BearCounter = () => {
  const bears = useStore((state) => state.bears)
  return <h1>{bears} around here ...</h1>
}

const Controls = () => {
  const increasePopulation = useStore((state) => state.increasePopulation)
  return <button onClick={increasePopulation}>one up</button>
}
Why is this library not in the default ? Because it shouldn’t be used by default to store global data. Instead, I recommend working with the Context API and only use Zustand if things start to get hairy.
Doc
pmndrsInstallation
npm i zustand
yarn add zustand
pnpm add zustand
Lodash
Lodash offers plenty of methods that make developers life easier. Ranging from testing if a value is truly empty to merging nested object, Lodash can do nearly everything.
However, I don’t feel like it should be installed on every project. Nothing wrong with it, but using it can be easily replaced by some helpers functions or with TypeScript.
You don’t have to rely on a library if all it offers is 10 one-liners. Build them yourself, you might even enjoy doing it. If you don’t feel like it, you can check 1 LOC to get some good one-liners.
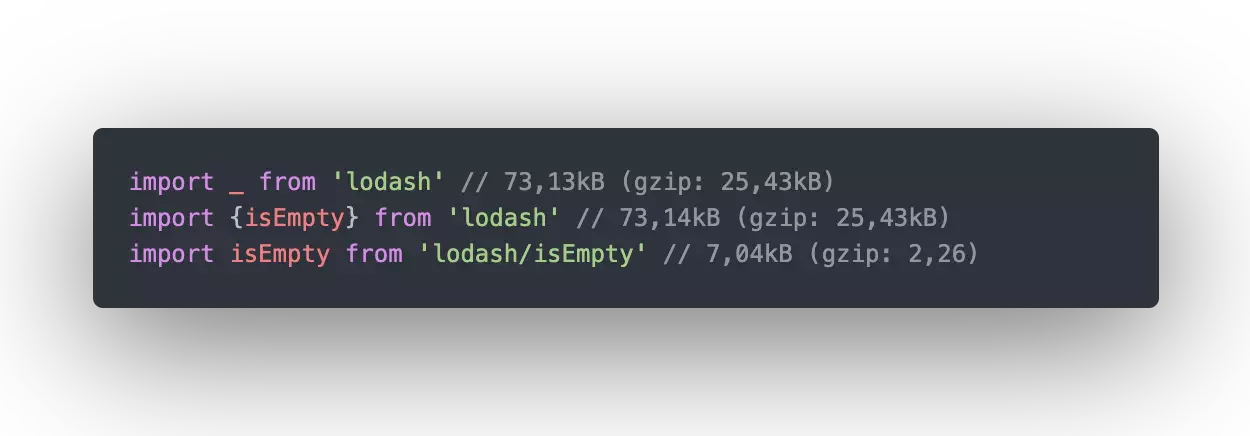
Besides, Lodash can have a massive impact on bundle size if not imported properly. I discussed that in my Next bundle size optimization article.
Doc
Installation
npm i lodash
yarn add lodash
pnpm add lodash
DayJS
Last library, date management. I agree that date can be a pain to work with and that libraries such as DayJS offer plenty of features that help developers.
However, not all date problems need a library to be solved. The plain Date objects get some improvements, and it’s easier to work with. So instead of installing DayJS when all you need to do is format a date, check this article that contains all you need to know about them:
 Zell Liew
Doc

Installation
npm i dayjs
yarn add dayjs
pnpm add dayjs
Final Recommendations
Here is the list of my go-to libraries when building simple and more complex applications. There is quite a lot of information in this article. I wanted to make an opinionated list for developers that might want to get help to kick-start their journey or engage in a discussion with a more experienced one.
One of the key elements is to keep the number of libraries low. As said in the beginning, updates are frequent and breaking changes occurs more often than we think.
On top of that, having fewer libraries should resolve in smaller bundles, better performances for both the user and for SEO. While it could take a bit more time for a developer to write its code (and that’s debatable), the end result will benefit everybody.
Finally, I have one last piece of advice. Once you’ve installed a library and started to use it, please read the documentation. Not because you’re using it wrong, but rather because you might find interesting features or better way to do things. Besides, it’s quite frequent to have developers giving advice or directives on how to do things right with their libraries.
That’s all I have, do you have any other libraries that I didn’t cover in this article and that are worth discussing?